EX4: Creating and incorporating moving images / videos with Adobe Aftereffects and Adobe XD
After Effects is an Adobe software which allows you to make detailed motion graphics and animations using text, shapes, images and icons. After Effects also comes with a library of visual effects that can be applied to videos, or you can download effects plug ins also.
After Effects uses key frames to set states for elements and to allow them to transform through the duration of the video. There are many keyboard shortcuts that can let you access properties such as opacity (t), scale (s), position (p), rotation (r) and effects (e). These keyboard shortcuts are handy as they let you jump in and out of different groups within your timeline.
“Motion Design is in very high demand at the moment, and the popularity of video means it’s likely that demand will only increase. Whether it be explainer videos, or animated adverts – Motion Design is very valuable. It increases engagement, creates conversation, and drives traffic through multiple communication channels. ” (Orchard, 2021)
As a graphic designer, knowing how to create motion graphics is a useful skill as a lot of design skills are transferable to motion design. I have been learning how to use After Effects by following along with tutorials before attempting to create my own motion graphics for the Freedom Festival website and social media.
This video I have created shows some of the skills that I’ve explored in After Effects. I have learnt how to combine images over videos and then developed this further by having an image fade in followed by text. I also looked at the effects panel to form a repeat pattern, and used scale to zoom in onto an icon, blurring the background in the process. All of these techniques were achieved by using key frames to make transformations to properties such as position, opacity and scale. I learnt how to edit keyframes using keyframe assistant to add easy-ease and other adjustments to add fluidity to transitions for a more professional appearance.
Typography can also be manipulated in After Effects. I have learnt some ways to add movement to typography and shown the results in this video. Adjusting typography is a bit trickier and requires more time, but the results are very fun and add edge to text which feels more engaging to watch. I have learnt how to create a mask effect with the stroke effect, so text appears to be drawn in. I used different colour layers to have the colour of the stroke change throughout the video. I found out how to make text follow a shape for a scrolling effect, and used duplicates of each layer and adjusted the scale property to create an endless loop of text. Then I created tracking text which appeared to move out and move back in, using keyframe assist to create more of a bouncy look to the text as it hits the side of the frame.
As I began to feel a bit more confident with the software, I started applying some of this skills to my own work and created my own animations.
I first created a simple animation showing my logo for the Freedom Festival 2024 rising up from the middle of the frame. At first, it was hard to figure out how to make this effect happen, as I was unsure of how to get the text to rise from the middle rather than the bottom, but I watched some tutorials and learnt how to use a shape mask layer to hide the text behind. I used the position tool to have the text rise up from behind this shape, and used ease effects to have it rise up in a smooth motion. I like how the logo becomes revealed and how it has a slight bounce to add a life-like quality to the text which feels more playful and light.
For my shorthand logo, I wanted to create a more detailed animation which animates different elements at different points. Something that is useful about After Effects is that you can use other Adobe files like Illustrator or Photoshop, and you can access the file layers to animate individually. That is what I have done here, bringing in the illustrator file and individually animating layer by layer to create a one-by-one sequence of events. First, the four lines begin to rise and stretch in unison – an effect I made by using shape masks to create the reveal. Then the two F’s fade in one after the other, which I did by using the opacity keyframe. Then the 2024 numbers rise in and drop down to the space in each corner of the square, finishing the animation. The animation only takes five seconds but feels a lot more interesting than just having the whole logo fade in as one. The introduction of each element one by one feels more fluid and keeps the viewers interest and attention throughout.
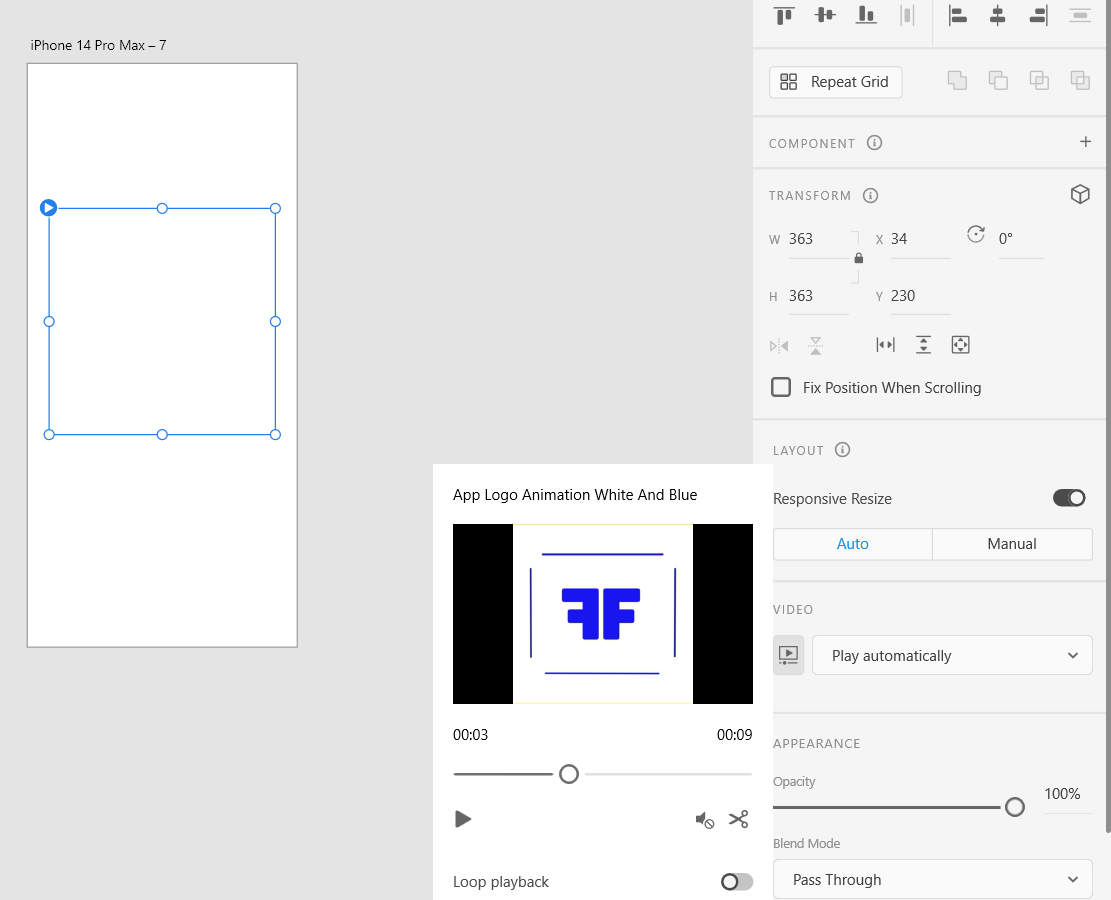
Incoporating video into Adobe Xd is quite easy. You just import your video and position it in your artboard. You can leave it like this or you can crop the video, make it loop and change it so that it plays automatically. I have used my secondary logo to create an animated loading screen which plays automatically before fading to the mobile home page using a tap animation to prototype this.
Reference List:
Orchard (2021) Why you should add Motion Design to your skillset [Article]. Available online: https://www.orchard.co.uk/blog/why-you-should-add-motion-design-to-your-skillset–20906.aspx#:~:text=Whether%20it%20be%20explainer%20videos%2C%20or%20animated%20adverts,to%20life%20and%20helps%20to%20make%20them%20compelling. [Accessed: 12/12/2023]